connect to wifi using terminal in ubuntu

1.Create file and add wifi name and creds (vi /etc/wpa_supplicant.conf)

network={
    ssid="ssid_name"
    psk="password"
}

2.Connect

sudo wpa_supplicant -B -i wlan0 -c /etc/wpa_supplicant.conf -D wext
sudo dhclient wlan0

More : https://askubuntu.com/questions/138472/how-do-i-connect-to-a-wpa-wifi-network-using-the-command-line

https://askubuntu.com/questions/294257/connect-to-wifi-network-through-ubuntu-terminal

sftp setup to restrict user to some /path

WHY?
– Secure access
– Secure path

adduser kool -s /sbin/nologin

#edit /etc/ssh/sshd_config and ADD

Subsystem sftp internal-sftp
   Match User kool
   ChrootDirectory /opt/dir1/dir2
   ForceCommand internal-sftp
   X11Forwarding no
   AllowTcpForwarding no


chown root:root -R /opt/dir1/dir2
chmod 755 -R /opt/dir1/dir2

chown kool:kool /opt/dir1/dir2/kool
chmod 700 /opt/dir1/dir2/kool

iptables port allow/block

//Block port 8080

iptables  -A INPUT -p tcp --dport 8080 -j DROP

//Allow port 8080

iptables -A INPUT -p tcp -m tcp --dport 8080 -j ACCEPT

//Delete rule from same command(-D)

iptables  -D INPUT -p tcp --dport 8080 -j DROP

//Delete iptable rule for 8080 as per line number

iptables -L --line-numbers
iptables -D INPUT 1

//List rules

iptables -S
iptables -S TCP
iptables -L INPUT
iptables -L INPUT -v

#save
service iptables save

Special File Permissions in linux setuid, setgid, sticky bit

setuid permission:

When program is executed with setuid permission it will executed as owner of that program.

-rwsr-xr-x. 1 root root 27856 Aug  9  2019 /usr/bin/passwd

as passwd has setuid set that’s why normal user can reset their password

#exec will be as owner user
chmod u+s  file_name 

#exec will be as owner user
chmod 4750   file_name

setgid permission:

When program is executed with setgid permission it will executed as group owner of that program.

-r-xr-sr-x. 1 root tty 15344 Jun 10  2014 /usr/bin/wall

as wall has setgid enabled it has all the permission as group tty has.

chmod u+g  file_name 
chmod 2700   file_name

Sticky bit:

Owner of files and directory and root can only delete the file when sticky bit is set.

drwxrwxrwt.  16 root root 4096 Oct 10 10:10 tmp

all linux /tmp directory has sticky bit enabled.

chmod +t /tmp

NOTE: Capital S,T displayed when user does not have execute permission on that file

Check tcp port with BASH and CURL

WHY?
– If telnet command is not present on system
– Easy to use

BASH:

ECHO:

#1
echo > /dev/tcp/192.168.0.183/22

#2
echo > /dev/tcp/192.168.0.183/22 && echo "open"

#3
echo > /dev/tcp/192.168.0.183/22 && echo "open" || echo "close"

#4
(echo > /dev/tcp/192.168.0.183/22)  > /dev/null 2>&1 && echo "open" || echo "close"

CAT:

cat < /dev/tcp/192.168.0.183/22

CURL:

curl -v telnet://192.168.0.183:22
curl -v telnet://hackfi.initedit.com:80

Deploy metrics server in kubernetes for auto horizontal scaling

1. Get the metrics server code form github

git clone https://github.com/kubernetes-sigs/metrics-server
cd metrics-server

#Edit metrics-server-deployment.yaml
vi deploy/kubernetes/metrics-server-deployment.yaml

#And add below args

args:
 - --kubelet-preferred-address-types=InternalIP,Hostname,InternalDNS,ExternalDNS,ExternalIP
 - --kubelet-insecure-tls

metrics-server-deployment.yaml will look like below

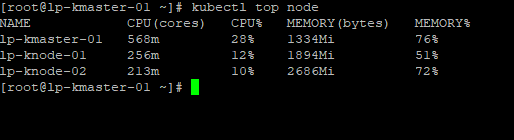
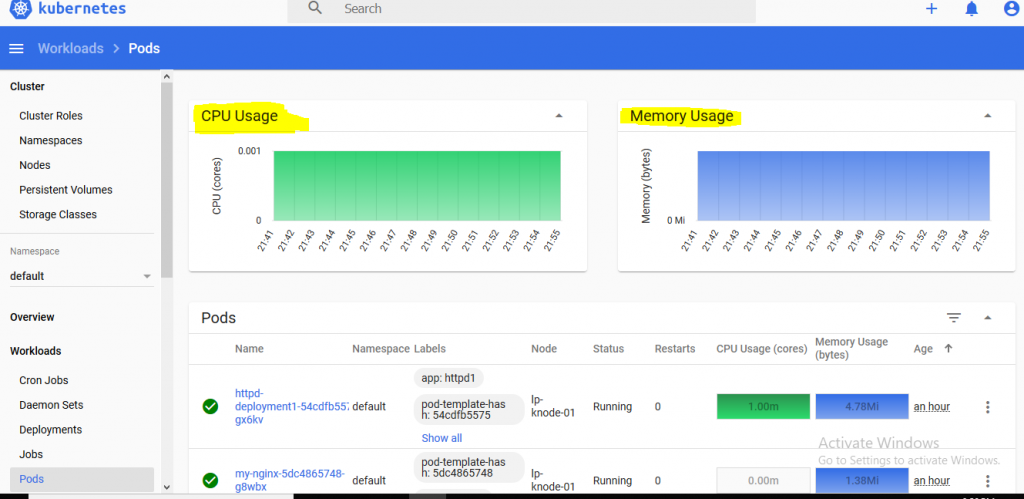
2. After deployment we will get the cpu and ram usage of node as below

3.Now we can write Horizontal Pod Autoscaler as below that will auto scale nginx-app1 deplyment if cpu usage will get above 80% max 5 pods.
– It’s checks every 30 seconds for scaling the deployment
– It’s scale downs the deployment after 300 seconds if the load goes down

kind: HorizontalPodAutoscaler
apiVersion: autoscaling/v1
metadata:
  name: nginx-app1-hpa
spec:
  scaleTargetRef:
    kind: Deployment
    name: nginx-app1
    apiVersion: apps/v1
  minReplicas: 1
  maxReplicas: 5
  targetCPUUtilizationPercentage: 80

4. nginx-app1.yml

apiVersion: apps/v1
kind: Deployment
metadata:
  name: nginx-app1
spec:
  selector:
    matchLabels:
      run: nginx-app1
  replicas: 2
  template:
    metadata:
      labels:
        run: nginx-app1
    spec:
      containers:
      - name: nginx-app1
        image: nginx
        resources:
          requests:
            memory: "128Mi"
            cpu: "100m"
          limits:
            memory: "256Mi"
            cpu: "200m"
        ports:
        - containerPort: 80

---

kind: Service
apiVersion: v1
metadata:
  name: nginx-app1-svc
  labels:
    run: nginx-app1-svc
spec:
  ports:
    - protocol: TCP
      port: 80
      targetPort: 80
      nodePort: 30083
  selector:
    run: nginx-app1
  type: NodePort

5. Random load generator

while(true)
do
curl -s http://SERVICE_NAME
done

Jenkins pipeline using secret credentials and password


pipeline
{
    agent { label 'master' }
    stages
    {
        
        stage('check_credentials')
        {
            steps
            {
            
              withCredentials([usernamePassword(credentialsId: 'c1', usernameVariable: 'uname', passwordVariable: 'upass' )]) 
              {
                sh '''
                   echo "usernamePassword = $uname $upass" > test.txt
                '''
              }
               
              withCredentials([usernameColonPassword(credentialsId: 'c1', variable: 'uname')]) 
               {
                sh '''
                  echo "usernameColonPassword = $uname" >> test.txt
                '''
              }
              withCredentials([string(credentialsId: 't1', variable: 'TOKEN')]) 
              {
                sh '''
                  echo "string = $TOKEN" >> test.txt
                '''
              }
              sh 'cat test.txt'
            }
        }
        
        
    }
}

simple custom fields in logstash – ELK

sample log :

abc-xyz 123
abc-xyz 123
abc-xyz 123

Sending logs to sample log ELK server:

echo -n "abc-xyz 123" >/dev/tcp/ELK_SERVER_IP/2001

custom1.conf

input {
    tcp
    {
        port => 2001
        type => "syslog"
    }
}

filter {
  grok {
    match => {"message" => "%{WORD:word1}-%{WORD:word2} %{NUMBER:number1}"}
  }

 #add tag
  mutate {
    add_tag => { "word1" => "%{word1}" }
  }

#add custom field
  mutate {
    add_field => { "logstype=" => "sample" }
  }
}

output {

    if [type] == "syslog" {
    elasticsearch {
        hosts => ["localhost:9200"]
        index => "custom1-%{+YYYY.MM.dd}"
    }
#for debug
#stdout {codec => rubydebug} 
    }

}

Run logstash to collect the logs

logstash -f custom1.conf

NOTE:
– if number1 was already indexed as string then you have to delete the old index
– if use add_field again with same name after grok it will show double value