Deploy metrics server in kubernetes for auto horizontal scaling

1. Get the metrics server code form github

git clone https://github.com/kubernetes-sigs/metrics-server
cd metrics-server

#Edit metrics-server-deployment.yaml
vi deploy/kubernetes/metrics-server-deployment.yaml

#And add below args

args:
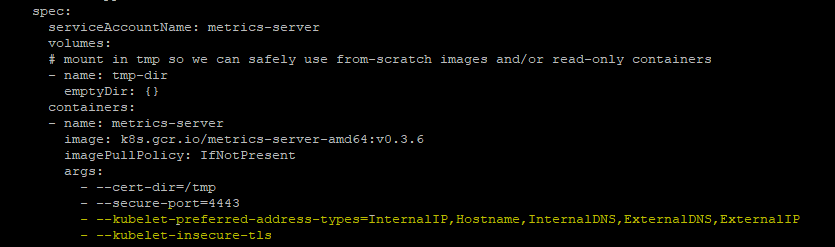
 - --kubelet-preferred-address-types=InternalIP,Hostname,InternalDNS,ExternalDNS,ExternalIP
 - --kubelet-insecure-tls

metrics-server-deployment.yaml will look like below

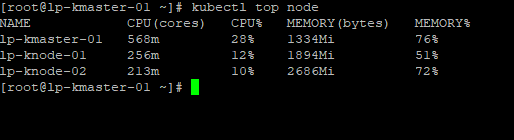
2. After deployment we will get the cpu and ram usage of node as below

3.Now we can write Horizontal Pod Autoscaler as below that will auto scale nginx-app1 deplyment if cpu usage will get above 80% max 5 pods.
– It’s checks every 30 seconds for scaling the deployment
– It’s scale downs the deployment after 300 seconds if the load goes down

kind: HorizontalPodAutoscaler
apiVersion: autoscaling/v1
metadata:
  name: nginx-app1-hpa
spec:
  scaleTargetRef:
    kind: Deployment
    name: nginx-app1
    apiVersion: apps/v1
  minReplicas: 1
  maxReplicas: 5
  targetCPUUtilizationPercentage: 80

4. nginx-app1.yml

apiVersion: apps/v1
kind: Deployment
metadata:
  name: nginx-app1
spec:
  selector:
    matchLabels:
      run: nginx-app1
  replicas: 2
  template:
    metadata:
      labels:
        run: nginx-app1
    spec:
      containers:
      - name: nginx-app1
        image: nginx
        resources:
          requests:
            memory: "128Mi"
            cpu: "100m"
          limits:
            memory: "256Mi"
            cpu: "200m"
        ports:
        - containerPort: 80

---

kind: Service
apiVersion: v1
metadata:
  name: nginx-app1-svc
  labels:
    run: nginx-app1-svc
spec:
  ports:
    - protocol: TCP
      port: 80
      targetPort: 80
      nodePort: 30083
  selector:
    run: nginx-app1
  type: NodePort

5. Random load generator

while(true)
do
curl -s http://SERVICE_NAME
done

Jenkins pipeline using secret credentials and password


pipeline
{
    agent { label 'master' }
    stages
    {
        
        stage('check_credentials')
        {
            steps
            {
            
              withCredentials([usernamePassword(credentialsId: 'c1', usernameVariable: 'uname', passwordVariable: 'upass' )]) 
              {
                sh '''
                   echo "usernamePassword = $uname $upass" > test.txt
                '''
              }
               
              withCredentials([usernameColonPassword(credentialsId: 'c1', variable: 'uname')]) 
               {
                sh '''
                  echo "usernameColonPassword = $uname" >> test.txt
                '''
              }
              withCredentials([string(credentialsId: 't1', variable: 'TOKEN')]) 
              {
                sh '''
                  echo "string = $TOKEN" >> test.txt
                '''
              }
              sh 'cat test.txt'
            }
        }
        
        
    }
}

simple custom fields in logstash – ELK

sample log :

abc-xyz 123
abc-xyz 123
abc-xyz 123

Sending logs to sample log ELK server:

echo -n "abc-xyz 123" >/dev/tcp/ELK_SERVER_IP/2001

custom1.conf

input {
    tcp
    {
        port => 2001
        type => "syslog"
    }
}

filter {
  grok {
    match => {"message" => "%{WORD:word1}-%{WORD:word2} %{NUMBER:number1}"}
  }

 #add tag
  mutate {
    add_tag => { "word1" => "%{word1}" }
  }

#add custom field
  mutate {
    add_field => { "logstype=" => "sample" }
  }
}

output {

    if [type] == "syslog" {
    elasticsearch {
        hosts => ["localhost:9200"]
        index => "custom1-%{+YYYY.MM.dd}"
    }
#for debug
#stdout {codec => rubydebug} 
    }

}

Run logstash to collect the logs

logstash -f custom1.conf

NOTE:
– if number1 was already indexed as string then you have to delete the old index
– if use add_field again with same name after grok it will show double value
LXC and LXD linux container

What’s LXC?
– API to communicate with with LXD(Linux container)

What’s LXD?
– It’s like VM for Linux containers

  • Install lxc and dependency
yum -y install epel-release

yum -y install libvirt lxc lxc-templates libcap-devel libcgroup busybox wget bridge-utils lxc-extra

systemctl start libvirtd
systemctl enable libvirtd
  • Check everything is working?
[root@lxc01~]# lxc-checkconfig
Kernel configuration not found at /proc/config.gz; searching...
Kernel configuration found at /boot/config-3.10.0-862.el7.x86_64
--- Namespaces ---
Namespaces: enabled
Utsname namespace: enabled
Ipc namespace: enabled
Pid namespace: enabled
User namespace: enabled
newuidmap is not installed
newgidmap is not installed
Network namespace: enabled
Multiple /dev/pts instances: enabled

--- Control groups ---
Cgroup: enabled
Cgroup clone_children flag: enabled
Cgroup device: enabled
Cgroup sched: enabled
Cgroup cpu account: enabled
Cgroup memory controller: enabled
Cgroup cpuset: enabled

--- Misc ---
Veth pair device: enabled
Macvlan: enabled
Vlan: enabled
Bridges: enabled
Advanced netfilter: enabled
CONFIG_NF_NAT_IPV4: enabled
CONFIG_NF_NAT_IPV6: enabled
CONFIG_IP_NF_TARGET_MASQUERADE: enabled
CONFIG_IP6_NF_TARGET_MASQUERADE: enabled
CONFIG_NETFILTER_XT_TARGET_CHECKSUM: enabled

--- Checkpoint/Restore ---
checkpoint restore: enabled
CONFIG_FHANDLE: enabled
CONFIG_EVENTFD: enabled
CONFIG_EPOLL: enabled
CONFIG_UNIX_DIAG: enabled
CONFIG_INET_DIAG: enabled
CONFIG_PACKET_DIAG: enabled
CONFIG_NETLINK_DIAG: enabled
File capabilities: enabled

Note : Before booting a new kernel, you can check its configuration
usage : CONFIG=/path/to/config /usr/bin/lxc-checkconfig

  • Create container with centos template
lxc-create -n centos7container -t centos

It will pull the centos container image from the internet and will use the centos template from /usr/share/lxc/templates/

  • Start the lxd container
lxc-start -n centos7container -d
  • List container and running
[root@lxc01 ~]# lxc-ls
centos7container

[root@lxc01  ~]# lxc-ls --active
centos7container
  • Attach to running container
lxc-attach -n centos7container
  • Stop and delete lxc container
lxc-stop -n centos7container
lxc-destroy -n centos7container